Voice Interface – System Testing

Once your Phrase Processor is correctly handling the test phrases in direct mode, it is time to move to narrated mode.

I am using my desktop PC to run the test player, so this is the first thing to get setup. Change the mode on line 22, and run the player. In narrated mode you get the option to step through each phrase in the list, and optionally repeat one if they were not recognised.

Here is a video of the Narrated test running on my home setup.

Once you are satisfied with your narrated tests, you can go live. The speech_reco.py program handles a number of miscellaneous commands that aren’t technically part of the home-hub domain: go to sleep, go away, repeat, etc.

I hope you have fun interacting with your home environment using voice.

Voice Interface – External Services

The Voice Interface uses Google’s Cloud Speech API, which requires registration.

If you followed along with the MagPi when you assembled your AIY Project, then you will already have a Google account and a credentials.json file. If not then you need to follow the instructions to register and obtain this file.

You may also want to modify entries in the preferred_phrases list on line 111 of speech_reco.py.  These provide hints to the google speech recognition engine. I’m not convinced they make much difference, but for difficult to understand words they may improve reliability.

To generate a Snowboy .pmdl file containing the pattern for your watchword, pop along to the snowboy site, register for a free account and follow the instructions to record or download a file.  I chose to use the most common watchword on the snowboy site, Alexa, as it had the most samples and would theoretically be the most reliable watchword. You should experiment with whatever word you choose.

So, on to system testing…

Voice Interface – Integration Testing

You will recall this diagram from the introduction:

We should now have all the software installed to be able to complete the first stage of integration testing.

If you explore the files in code/vox you will find the test_player.py script. The test player can operate in one of three modes:

  • Direct
  • Narrated
  • Log

For this test we want to set the Direct mode, where test phrases are piped to the processor. You can set the mode on line 22.  The Phrase Processor is initialised with 3 parameters:

  • Base url for the home-hub
  • Timeout (secs) for refreshing api cache
  • Home Zone – so hub-vox can answer ‘where am I?’

Run the test player with the following command:

python test_player.py

I chose to run my tests on a Windows PC for convenience, as there is a simple interface with windows text-to-speech capabilities, so you may have to modify the test_player to run it on the pi.

I have provided a sample testfile to demonstrate the process, however, you will want to edit this to meet your own requirements, or start from scratch with your own list. During testing, you can move terms to the top of the list while you make adjustments to the Phrase Processor configuration to handle the phrase.

Once you are happy with the configuration and your test phrases are understood, you can move on to system testing, but first there are a couple of things that need to be completed: Google credentials and Snowboy watchword.

These are covered in the next post.


Voice Interface – Pi Hub-Vox

I am using a Pi 3 Model B with the Voice Hat attached, and assembled as per the instructions provided in the MagPi magazine. Internet access is required, if you want to use the Google service or other cloud offering for Speech-To-Text and obviously network access is required to make REST calls to our home-hub.

The published AIY design requires the big green button to be pushed (or a hand clap) to activate listening mode. Most users want a wake-word as in Alexa, OK Google, Hey Siri, etc.  I was attracted by the Snowboy Hotword Detection Engine, and have recorded a hotword for my system. I still use the green led as a listening indicator.

The listening mode is a contentious subject. On the one hand we do not want voice assistants streaming all our conversations to the cloud, however, with a dedicated voice appliance like the hub-vox, repeatedly issuing wake commands becomes tedious.  Snowboy, being a local detector, provides us with control over this balancing act.

A warning that there is a lot of software that requires installing for the hub-vox, but a script has been written which will complete the task based on a plain vanilla Raspbian Stretch Lite operating system. If you want to install each component separately, you can copy and paste commands from the script to the command line.

Fetch the script…

wget http://www.warrensoft.co.uk/home-hub/linuxscripts/vox/setup.sh

edit the script to customise the settings…

nano setup.sh

make the script executable…

sudo chmod +x setup.sh

and then run it…

sudo ./setup.sh

Here is a summary of the main components installed:

  • Samba – for managing our code
  • Vox code – from the project repository
  • Voice Hat drivers – for microphones and speaker
  • Snowboy – hotword detection
  • PyAudio
  • Python Speech Recognition
  • Google api python client – STT
  • Flac, Pico2wave, Sox – TTS

In the next post we will assemble a test list of utterances and pipe that through the Phrase Processor.

Voice Interface – Home Hub REST

In a previous post we developed a simple api facility for home-hub slaves to enable remote control. The voice interface will use this api for controlling actuators, but it requires a much richer interface to provide a full interactive voice service.

The following instructions will detail how to modify your home-hub to add a full REST api. This will allow us to read data from any table or view in the hub’s database.

Our REST commands will be of the form:

http://home-hub/rest/zones

Normally, the apache web server would throw a page not found error, but with some additional configuration we can direct all such requests to a specific service page.

The first step is to enable the apache rewrite module:

sudo a2enmod rewrite

Then we need to edit the configuration:

sudo nano /etc/apache2/apache2.conf

and find the document root spec:

<Directory /var/www/>
 Options Indexes FollowSymLinks
 AllowOverride None
 Require all granted
</Directory>

and change AllowOverride from None to All.

Restart apache…

sudo service apache2 restart

Then we can add the following .htaccess file to our document root at /var/www:

<IfModule mod_rewrite.c>
 RewriteEngine On
 RewriteBase /
 RewriteCond %{REQUEST_FILENAME} !-f
 RewriteCond %{REQUEST_FILENAME} !-d
 RewriteRule . /rest.php [L]
</IfModule>

and this will send any unfound page requests to rest.php

Now we can fetch the rest php script from the project repository with the following command:

wget -P /var/www/html http://www.warrensoft.co.uk/home-hub/code/website/html/rest.php

The same warning about security applies here. The rest api has no authentication built in. It provides an access-most-areas pass to inspect (but not change) all the hub’s database contents, so if your hub is internet-facing you are strongly advised to add your own security measures.

Finally we can test our rest interface:

http://home-hub/rest/zones

In the next post we will setup a new Raspberry Pi in the role of Voice Assistant.

Voice Interface – Phrase Processor

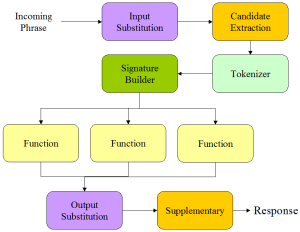
As the name suggests, the Phrase Processor processes a phrase and returns a response. If the phrase is a call to action, then the action is performed and a confirmation forms the response. Here is a block diagram.

The real work is performed by the Functions, which talk to the hub to find out the current kitchen temperature, or to switch on the heating, etc.

The Input Substitution converts everyday terms into terms the hub will understand e.g. rain > precipitation, etc.  Similarly, the Output Substitution can change words that are not pronounced well by the Text-To-Speech component e.g. Beaufort > Bofort.

Candidate Extraction involves splitting a phrase into likely candidate terms. For example, we may have a zone called Bedroom 1, so if we were to utter the phrase ‘what is the humidity in bedroom 1‘, our tokenizer might spot humidity as a measurand, but might not recognise bedroom 1 as a zone. By using a word count of 2, we can extract the following candidate terms: what, what is, is the, .. , bedroom 1 and we have a fighting chance our zone will be spotted.

The Tokenizer takes candidate terms and looks them up in lists of terms. Term lists are read from the hub: sensor names, zone names, actuator names, measurands, etc. or derived from pre-configured command lists. It then generates a set of tokens which provides automatic de-duplication.

The Signature Builder converts the set of tokens into an ordered function signature and marshals the parameters.  So taking our example from above, the tokenizer would have generated a humidity measurand token and bedroom-1 zone token. These would be converted into the measurand_zone( x, y ) function signature, and the function would be called. This approach allows us to utter the reverse phrase ‘bedroom 1 humidity’ and still have it handled by the same function.

Specific sensors can be configured to report supplementary information for certain value ranges. For example, wind speed in mph can be supplemented with a familiar description e.g. 40 mph plus gale, 8 on the Beaufort scale.

This covers the structure of the Phrase Processor. In the next post we will address minor changes we need to make to the home-hub to be able to implement the REST interface.

Voice Interface – Introduction

If you were lucky enough to get hold of the Google Voice AIY Kit, then this series of posts will be of interest. They provide details for a voice controlled interface to the home hub, enabling you to get sensor readings and control actuators using voice commands.

I have implemented a system that runs on a separate raspberry pi, and queries the home hub using a new REST interface. Having experimented briefly with the Google software, I did not feel it was easy to adapt to my requirements, so this solution only uses the Google hardware. The software is a mix of components selected for the task. The design goal is to have a system that can work out-of-the-box with any home-hub installation, irrespective of what zones, sensors and actuators are installed.

Part way into this project I realised that testing voice assistants was particularly difficult.  Interpreting voice commands is not an exact science, and this causes frustration when you are designing new software.  For this reason I have implemented an architecture that aims to make this less problematic.

The first stage involves creating a list of the voice commands you want to process. These are fed directly into the phrase processor, and the response is displayed. The list can be updated with alternative phrases that you really want your hub to understand, while the configuration is adjusted to make them understood.

When you have your Phrase Processor suitably equipped to handle all the voice commands, you can move on to stage 2.

Now the Speech Recogniser is brought into play, and the test list is read out.  What we would hope is that our voice commands are still obeyed correctly, but any discrepancies at this stage will be solely down to failure of the Speech Recogniser.

In the next post I will examine the Phrase Processor in more detail.

Hub Database Backups

When you have all your sensors, actuators and impulses configured, and you have defined all your rules and collected a number of months worth of statistical data, the last thing you want is for a crash or gremlin to corrupt your database. The software can be rebuilt with relative ease, but restoring the configuration might not be so easy.

What we require is a nightly database backup, to a separate location that will be safe should our Pi come to any harm. I am using a shared directory on my NAS drive, but a small USB drive would be just as good.

If you want to set this up, add the following commands to your crontab scheduler using sudo crontab -e:

SHELL=/bin/bash
1 1 * * * /usr/bin/sudo pg_dump -h localhost -U postgres hub -f /mnt/piback/$(hostname).$[$(date +\%-W) \% 2].$(date +\%a).sql

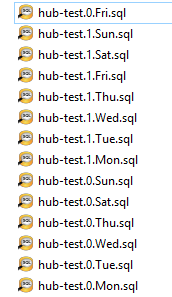
/mnt/piback is the mounted directory for my installation, which you may need to tailor for your own setup. There are many tutorials on the web which explain how to add an external drive to the Pi.  The command will produce a rolling backup which will wrap around every fortnight:

If disaster should strike you can restore to a known good point.

In a future series of posts I will be investigating voice control for the hub, using integration with the Google AIY Voice Kit.

Controller – Amazon Dash Button

The Amazon Dash is a self-contained WiFi enabled remote control button, available to Amazon Prime members, that we can interface with our home hub as an Impulse button.  The advantage is that we don’t require physical wiring or additional electronics – we just sniff the network looking for the signature mac address of the button. The beauty of this adaptation is that we can implement hybrid Impulses, that respond to either fixed buttons connected to GPIO pins, or dash buttons free floating on the network.

The process to configure the button, without actually committing yourself to the repeated purchase, is well documented elsewhere. The key piece of information we require is the button’s mac address.  I was able to glean this from my router log, or you can try the python test program sniff_test.py below.

import socket
import struct
import binascii

mac_dict = {}

RAW_SOCKET = socket.socket(
 socket.AF_PACKET,
 socket.SOCK_RAW,
 socket.htons(0x0003))

while True:
    packet = RAW_SOCKET.recvfrom(2048)
    ethernet_header = packet[0][0:14]
    ethernet_detailed = struct.unpack("!6s6s2s", ethernet_header)

    arp_header = packet[0][14:42]
    arp_detailed = struct.unpack("2s2s1s1s2s6s4s6s4s", arp_header)

    ethertype = ethernet_detailed[2]
    opcode = arp_detailed[4]
    if ethertype == '\x08\x00' and opcode == '\x00\x00':
        mac_address = (
         ':'.join(s.encode('hex')
         for s in binascii.hexlify(ethernet_detailed[1]).decode('hex')))
         if mac_address in mac_dict:
             mac_dict[mac_address] += 1
         else:
             mac_dict[mac_address] = 1
 
        if mac_dict[mac_address] < 5:
            print "Source MAC: ", mac_address, mac_dict[mac_address]

Run the test program with the following command:

sudo python sniff_test.py

and you should see a list of mac addresses from devices on your network. Wait a while to hoover up non-dash packets then press the button, and look for a different mac address. You may see double entries for the dash, but don’t worry as this will be handled by our existing software debounce routine.

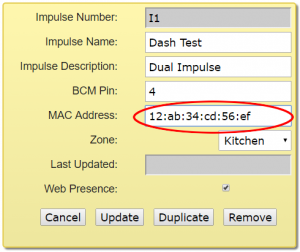
Once we have discovered the mac address we need to add it to the existing impulse configuration.

The sniffing is performed by a separate thread in the hub main program. Download the new main_sched py file:

wget -O /usr/local/bin/code/controller/main_sched.py http://www.warrensoft.co.uk/home-hub/code/controller/dash/main_sched.py

and a revised impulse processor:

wget -O /usr/local/bin/code/controller/impulses.py http://www.warrensoft.co.uk/home-hub/code/controller/dash/impulses.py

and restart the controller to use the modified files.

Now you should be able to enjoy remote control for any of the devices in your hub.

In the next post I will look at backing up the hub database.

Controller – BME280 Installation

Once you have your BME280 sensor assembled you need to fetch the python scripts to talk to it, but first we need to prepare the pi to enable the serial interface for this purpose.

By default, the serial interface is available for console login, so this needs to be disabled.

sudo raspi-config

choose option 5 – Interfacing Options, and option P6 – Serial.

Would you like a login shell to be accessible over serial? Answer No.

Would you like the serial port hardware to be enabled? Answer Yes.

Exit raspi-config, but don’t reboot just yet as we have a number of other changes to make first.

Disable the getty service:

sudo systemctl disable serial-getty@ttyAMA0.service

Install python serial…

sudo apt-get install python-serial

Add the following files to the controller…

wget -nH -x --cut-dirs=3 -P /usr/local/bin/code/controller/ -i /usr/local/bin/code/controller/manifest6.txt http://www.warrensoft.co.uk/home-hub/manifests/controller/manifest6.txt

uncomment the bme280 sensor in /sensor_helpers/__init__.py

and reboot the pi.

You can now check the serial port is available with the following:

 ls -l /dev

and you should see the following alias:

serial0 -> ttyAMA0

Now it should be safe to connect your sensor module to the pi.  If you do this before completing the configuration you may have connection issues, as the pi is interpreting your module as a login.  Note that the Pi TXD (BCM 14) connects to the modules Rx line and Pi RXD (BCM 15) connects to the modules Tx line. The remaining connections are just 3v3 Power and Ground. I recommend you shutdown and power-down to make these connections.

Add a new sensor using the website Organisation page, and set the sensor function to:

bme280./dev/serial0.4800.0

This function is constructed from 4 parts:

helper . serial-port . baudrate . channel

The serial port is /dev/serial0 which is an alias to the ttyAMA0 port we are connected to.

The baud rate is fixed in the picaxe program, at 4800, which works well in my setup.

The channel is a value of 0 – Temperature, 1 – Atmospheric Pressure or 2 – Relative Humidity.

With your new sensor configured you should be all set to take readings.

In the next post I will cover interfacing to the Amazon Dash button.